
Damn you Pinterest! Damn you, for sparking creativity and making it look easy. I'm sure everyone who Pins, has seen the cutest ever panda cake pops.
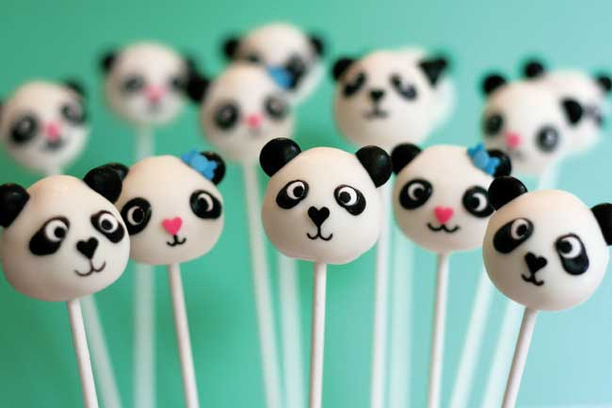
Seriously, aren't these just absolutely ADORABLE? Yeah, well they SUCK to make. My cousin's son was turning two, and his mom wanted a panda theme. She had made a Facebook post, asking around if anyone knew anyone that could make these cake pops. And of course, I volunteered. Glutton for punishment? I have no idea. I have a love for baking, and love a great challenge. However, I wasn't aware just how challenged I would be on this adventure.
The link takes you to Bakerella's web page. Usually, Pinterest pins take you to a blogger's site and you get instructions. NOT THIS ONE. You have to buy the book. I'm sure a person could just "wing it" and try to do it on their own, however I'm not THAT person. I like directions, I like reading, and I could totally benefit from purchasing the $8.00 book. Since I had to purchase the book, I will not reveal every step to making cake pops. Seriously, it's $8 for the ebook, and I'm sure there are copyright laws or something to that effect.
This project took TWO l-o-n-g days. Again, not what I was expecting. I have a cake pop maker, you know the cute one that looks like a waffle iron? It's fun to use, my daughter and I played with it at Christmas time. However at that time, we just used it to make the little cake balls, and didn't dip them in the melted chocolate/candy, or put them on a stick. So, I tried the magic cake pop maker. WHOMP WHOMP! That was a total freakin' bust. The pops were TINY, and just didn't come out right. Then I knew it was time to refer to the book. I read the book, like seriously READ the book, and made the cake balls they way they were supposed to be made. It made a HUGE difference, and tasted oh so much better.
My handmade cake balls
Chocolate of course
I should have taken a picture of the horrendous previously made cake balls,
and again, I didn't take a picture. Duh me

Cake balls stabbed, and prepped for dipping

Ghetto double boiler.
I just haven't had time to find my real double boiler.

Dipped and drying.
I made the ears out of fondant,
and applied them to the balls before
the melted chocolate hardened.
That nifty little cake pop stand I purchased came in quite handy. However, next time I'm sticking to a foam block. The holes in the stand were too close together and it made it a little harder to place pops in without touching other pops. Also, the sticks went straight through the bottom of the stand, leveling them on the counter top. If I tried to lift the stand the balls would fall to the top of the first disk. Not fun!


Pretty easy stuff, so far.
And now the fun part....
Decorating the faces of the adorable little pandas.
The book made the decorating part seem quite easy. It wasn't. I couldn't find the sprinkles necessary ANYWHERE! I went to multiple stores: Hobby Lobby, Michael's, Target, HEB (local grocery store), and AGS Cake Supplies. All no to avail. The one and only item the author used, that I was able to find was an edible food writer/marker. Aaaaaaaand it totally SUCKED!!! The marker would not write on the chocolate, it reminded me of writing on Easter eggs with the white crayon. You know, the waxy film that protected the egg shell from being colored, how it bunched up and left little waxy reminants. The marker would just not color. I was pretty miffed. Only to find out later, while at a cake shop that, "yeah, the Wilton's markers tend to clog easily". Geez, thank you for allowing me to completely waste $8.
Failed attempt #1 - drawing Panda face with edible marker

Failed Attempt #2 - Eyes made of fondant, and painted with edible marker.
Painted nose and mouth with food gel

Failed Attempt #3 - Eyes made of fondant, and painted with edible marker
Painted nose and mouth with food gel

Semi successful attempt #4 - Piped on face with Royal Icing.
I piped icing on the face, and shaped it
with a fine tipped paint brush.
Once the icing dried, I painted over it with the food gel.

SUCCESS!!!
After the Royal Icing set, and I finished painting all of the faces and ears (32 total pops), I applied a small dot of white royal icing for the eye, then painted the dot for the iris with the food gel.
Again, the food marker failed me.
So this little sucker was the end result. A completely hand painted panda face.
I was very very satisfied with the result.

I was going to individually wrap the pops, but as you can see, the black gel smudged.

I ended up putting the pops on foam.
I cut a round foam ball in half, and glued them to a paper plate.
I cut tissue paper into little squares, and shoved them into the foam
to add a little somethin' to the look. Actually, my 11 year old
daughter did one ball, I did the other.

Again, I failed to take a final picture. This project literally took two days. I was exhausted and so frustrated throughout the entire process. But in the end, I LOVED my beautiful creations. Everyone else loved the cake pops, and it was funny to see mouths turn black from the painted gel. My best compliment was from my aunt, who NEVER eats sweets. She said they were so good, she had to eat two. That really made me proud. I most definitely will continue to make cake pops, but I will NEVER again do one that is this detailed. Lesson learned. Actually, many lessons learned.
Keep Calm and Bake on!
Good job, sister! You know what else works for fine detailing? A paintbrush and gel food coloring. It dries nicer and gives you better leeway to work. You did great!
ReplyDeletethanks for the tips and information..i really appreciate it.. southern california wedding cakes
ReplyDelete